Tape hair extensions are an incredibly popular method of hair extensions due to how flat they sit against the head and how quickly they can be installed.
Tape-in hair extensions offer a great way to add length and volume to your hair while also allowing you to style your hair in many different ways. Each piece of these extensions comes with a small strip of medical-grade adhesive at the base. Your stylist will attach the adhesive to your natural hair to install the wefts.
Tape extensions come in the form of wefts rather than single strands. The wefts contain equal amounts of hair, laid out uniformly on the weft. It’s crucial to have these wefts correctly installed for a natural look and beautiful finish.
Tape-in hair extensions are recommended for thinner hair because the wefts create less tension on your natural hair than most other extension. As such, you can wear them with confidence and the assurance that your hair is safe.
Applying tape-ins also takes less time than applying fusion or beaded hair extensions. And unlike other extensions with thick bases that might stick out, tape extensions look more natural since they stick fully flat against your head.
Let’s have a look at how to put in tape-in extensions.
How To Install Tape-In Hair Extensions
If you are a DIY fanatic, you might be tempted to try installing tape-in wefts at home. As such, you may wonder how to put tape-in hair extensions yourself. Or maybe the adhesive tape has made you think that the tape extensions are a snap to apply.
But unlike clip-in extensions, installing tape extensions is not as easy as it may seem. Try it by yourself, and you could end up damaging your natural hair and the wefts (unless you’re a stylist, of course). We recommend you visit a skilled stylist to install your tape extensions for the best outcomes.
Let’s have a look at how to put in tape-in extensions.
The Installation Process
The installation starts with washing and drying your natural hair, so it’s as clean as possible. Only Apply Tape Hair Extensions. No conditioner will be used. Second, the stylist will determine the number of wefts you’ll require. Most people need three to five tape-in wefts. But depending on your own hair’s length and volume and your hair goals, you may require more wefts (or fewer).
When applying each piece of tape, ensure that you have created a clean section with no stray baby hairs. Flyaway hairs that get caught in the tape can cause traction alopecia, therefore using a tool such as a hair gripper can help to ensure any loose hairs are secured out of the way.
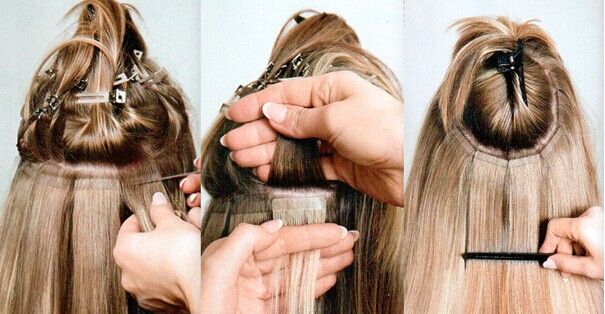
Section your first piece of hair for the tape installation, and use small section clips to keep any flyaway hairs from underneath getting in the way. If you are fitting a full head of hair extensions you would start your sectioning from the back, however, for the purposes of this demo, we are only applying hair extensions to the sides of the head.
Place your first hair extension underneath the section you have taken, and use your thumb to gently secure as much of the hair to the tape, trying not to touch the sticky surface of the tape too much.
Lay your hair extension flat, and then place the top piece of tape onto the top layer of your section, ensuring it is inline and the majority of each of the sticky surfaces are in line with each other.
Avoid Installing Tape-Ins By Yourself
Do not try to DIY it at home because it’s pretty challenging to determine the exact amount of hair that has to be placed between the wefts and then decide the alignment level for each section. Also, remember that you’re installing them to the back of your head, which can be quite tricky. How you apply the wefts will also determine if they look natural or fake so that professional installation will yield much better results.
Going to an experienced stylist is critical because even a tiny error will be a dead giveaway that you’re wearing extensions. Poor installation can also make you feel uncomfortable wearing the extensions. Another benefit of having a professional install the wefts is a seamless blending of the extensions with your hair. A perfect blending ensures no one notices that you’re wearing wefts.
Cutting and coloring are two more elements determining whether your extensions look and feel natural. Make sure to choose a shade that matches your natural hair color. The length and volume of the wefts must be coherent and in harmony with your desired hairstyles.
The best technique to make sure your wefts look natural is by placing them uniformly across your hair. It’s also a good idea to leave some amount of your natural hair exposed on the crest and sides to cover the tap extensions.
Once installed, you’ll have the extensions attached to your hair 24/7 for the next six to eight weeks. After that, you must visit your stylist to adjust and move up the wefts because they become loose over time due to your natural hair’s growth. You can reuse the wefts three or four times before they wear and will need to be replaced.
Source: Collected


